FFXV Warpstrike
For this project, I wanted to re-learn unreal since I had only used it a few times and I wanted to familiarize myself with the C++ side of things. After looking at Mix and Jam, I realized I could remake the warp strike quite well in Unity3D but in a lot of ways, had no earthly idea how to replicate it in Unreal. This especially included the shader system.
While game engines can be quite different, nuances in philosophy, style, and general know-how all revolve around similar concepts. I still had an Update() function for frame-based events and I still had animation events to help time and activate special effects, and more on specific frames. I try to be as language/tool agnostic as possible when it comes to things like this since I believe that being able to add a key concept to your repertoire for recognizing patterns in problems is more strong than being able to only solve a problem on a single platform or situation.
And so I approached Unreal with the broad mindset of “I know what needs to be done, I just need to learn the details”. I started the project by doing some research on Unreal’s coding and framework, and after I had watched a few videos I jumped right into a C++ project. The editor confused me at first since I didn’t necessarily have everything I wanted right at my fingertips. After importing a fun model, and some animations from mixamo, I opened up visual studio.
I edited my header file and made sure that I had everything I needed to build a basic “player character” right there. It was different from Unity in that I couldn’t try to separate features into individual scripts (this way I can reuse say a shooting script elsewhere). I had one class to edit (which in my case inherited from the UE4 pawn class). I used some of Unreal’s existing movement components, which I found to be an interesting change of pace since it worked perfectly right off the bat for what I wanted to do. At first, I felt quite guilty about using premade components- this was very much, unlike you-nity where you make the scripts for practically everything. It made me quite concerned for supporting specialized movement mechanics but in a way, it was refreshing to have basic movement up and running in about 5 minutes.
At this point, I had a basic moving t-pose character with no working camera, so I added a spring arm component to my player class and set up the hierarchy appropriately. After a few modifications and tweaks here and there, I had a follow camera with a spring arm component! (This would allow the player to back into a wall without the camera going through the wall). At this stage, I also worked out some funny physics bugs (things like locking rotation on different axis etc…)
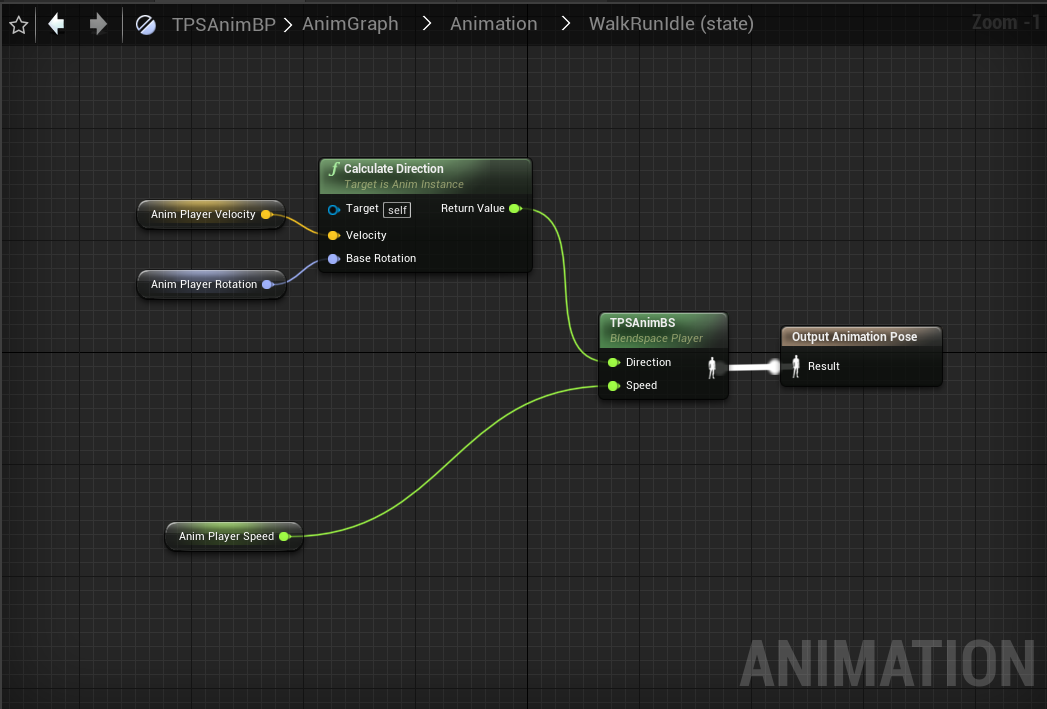
After changing my static mesh to an appropriate skeletal mesh, I got down to making my animation blueprints. It was similar to unity in that I still had an easy, visual way of making state diagrams, but unlike Unity, the way you went about them was very different. I made a special class for the animator that would expose certain variables from the player allowing the blueprint to appropriately modify assign an animation based on animation events, but also my walk animation a blendspace. The blendspace was pretty much just like how I used blend trees in Unity, so not much changed there. The blendspace gave the character a fluid movement system. I chose to do this via blueprints for obvious reasons, it just seemed far too streamlined and easy to do it this way. The animations all had the appropriate animation events that were utilized through the blueprints system since that seemed the easiest to implement at the time.


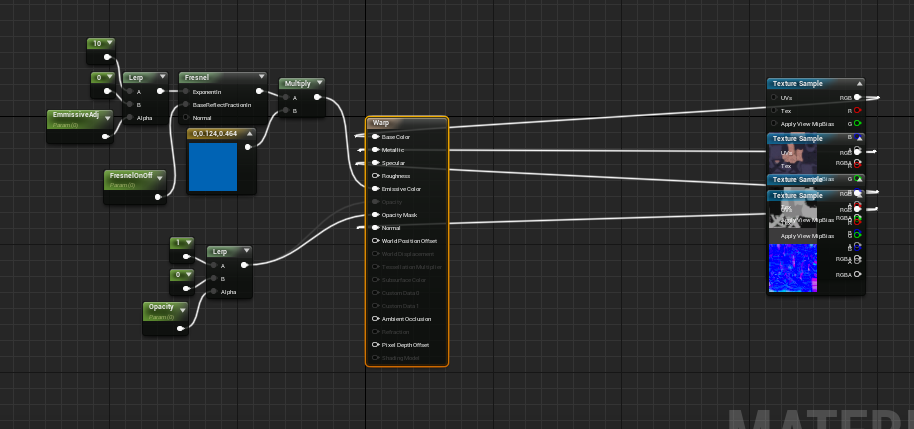
Now that I had all of that done, I worked out the logic for the attack animation and added it to my animation state diagram. I got the input handled for it in C++ and now was when the meat of the project began- the shader. I hadn’t focused on making shaders before, it wasn’t something I had ever needed to do for any of my prototypes. But luckily a seminar course taught by Ben Cloward on youtube, and my previous knowledge of Modeling and Texturing from my last semester at college helped me. I understood what each of the base nodes were on my existing object, and all I had to learn were the tools that Unreal was giving me to create. Not that that wasn’t a challenge though, it’s just that I wasn’t starting at level 0 in terms of understanding. I used fresnel and some opacity changes to achieve the effect, and after a day of learning and a day of tinkering, I decided it was time to cut it off where it was. I quickly realized that the only thing that was going to help was practice, applying what I knew in different situations, and deep exploration. I did learn quite a bit though!
To recap, now I had a working player with movement and attacks, and I also had a shader I could use. Now my warp strike mechanic was ready for enemies. I didn’t need complex AI or boss mechanics, but I need something for the player to target. To be honest, the enemy part was the easiest of my problems, I started by making a new class called enemy that inherited from the actor. I did notice using an actor iterator come up on google, but that seemed just like using a “FindGameObjectWithTag(string)”. It would work for a small prototype like this but it wasn’t a scalable solution. In the end, I made it such that the player object had an array of enemy objects. Every time an enemy was instantiated, it would automatically add itself to the player’s enemy object array. On button input, it would select the nearest enemy in the array. As this was just a prototype, I didn’t restrict it via range, but of course, that’s very simple if conditional to write out later on.
In the enemy:
for (TObjectIterator<AMyCharacter> ObjItr; ObjItr; ++ObjItr) {

		AMyCharacter* character = *ObjItr;
		character->AddEnemy(this);
	}
In the player’s header file i’d do the below and initialize it appropriatly on play:
UPROPERTY(EditAnywhere, BlueprintReadWrite, Category = "Gameplay")
		TArray<AEnemy*> enemies;
Now that my player knew where all the nearby enemies were, it had an easy job when I hit the attack button- play the attack animation, do shader stuff, and on the right frame run a function that would teleport the player in front of the enemy! The first bit was already done, the last bit took me about 2-3 lines of code. To teleport to a selected enemy, I made an animation event at the appropriate frame and teleported the player to the enemy.
To select nearest enemy:
//Get nearest enemy
void AMyCharacter::SelectEnemy()
{
	AEnemy* closest = nullptr;

	for (int i = 0; i < enemies.Max() + 1; i++) {

		if (closest == nullptr) {

			closest = enemies[i];

		}

		if (GetDistanceTo(enemies[i]) < GetDistanceTo(closest)) {

			closest= enemies[i];


		}


	}

	if (Target != nullptr && Target->GetName() != closest->GetName()) {
		Target->TargetArrow->SetText(" ");
	}

	Target = closest;
	Target->TargetArrow->SetText("^");
	Target->TargetArrow->SetRelativeLocation(FVector(0.0f, 0.0f, 80.0f));
}
To handle the warp:
//Warp Handling
void AMyCharacter::Warp()
{
	SkeletalMesh->SetScalarParameterValueOnMaterials("EmmissiveAdj", EmmissiveAdj);
	SkeletalMesh->SetScalarParameterValueOnMaterials("FresnelOnOff", FresnelOnOff);
	SetActorLocation(Target->GetActorLocation());

}
To add in the shader, I had to seriously scrutinize the warp strike shaders timing- how it faded in, faded out, and when exactly in the attack animation it proc’d. I looked up a video that showed it off and took a good amount of time trying to at least match the timing, and I also went back and revised the shader once more. I had a hard time finding code that would use shaders like this one appropriately, so I took the hint and used blueprints to implement it, using timing curves to handle the fade in fade out of the fresnel and opacity and voila!
-Kshaya